Do you ever look at the icicles dripping off your snow-covered house and then look next door to your neighbor’s tidy home and wonder what they’re doing that you’re not?
Next time, look a little closer. If you see zigzag lines on your neighbor’s roof, where the edge of the roof meets the gutter, that’s your answer. Those lines are roof cables, the simple upgrade that’s stopping icicles and ice dams from forming on their roof.
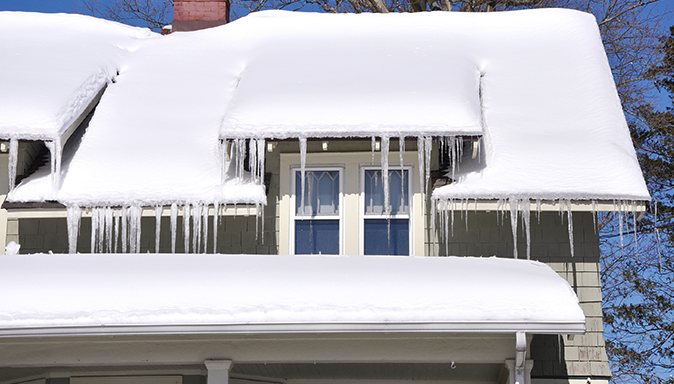
Few winter-weather issues are as sneaky—or as damaging—as ice dams. By the time you notice a ridge of ice hanging from the gutter the damage has usually already begun: warped shingles, soaked insulation, and water stains that form along ceilings and walls. The good news? Roof heating cables are an inexpensive way to keep ice dams from forming in the first place and installing them now is one of the smartest winter investments you can make. In this blog post, we take a closer look at why you need roof cables, how they work, why they matter, and how to install them at your home.
What Causes Ice Dams?
To understand why roof heating cables work, you need to understand why ice dams form in the first place. When it’s cold outside, heat rising from your living spaces can warm the underside of the roof, melting the snow that’s sitting on the roof and sending runoff towards the eaves and gutters—an area that stays colder that the rest of your roof because it extends beyond the heated part of the house. When meltwater reaches the overhang, it refreezes and the vicious ice dam cycle begins: layer after layer of ice builds up until you’ve got a thick ridge that traps more melting snow behind it.
That trapped water has nowhere to go but under the shingles, where it can find its way into your attic and, ultimately, into your living spaces. Even a small dam can cause thousands of dollars in damage. And once they form, it’s a challenge to remove ice dams safely. Prevention is the real solution—and that’s where heating cables come in.
What Roof Heating Cables Actually Do
Roof heating cables don’t melt every bit of snow on your roof. Instead, they’re designed to warm just the area of your roof where ice dams form to allow meltwater to flow freely rather than refreezing and backing up.
Most systems use a self-regulating thermostat that turns the cables on only when temperatures dip below 50°F. That means they’re not running constantly—only when the temperature dips into the range where ice dams form.
How They’re Installed
Roof cables are installed in a zigzag pattern for a good reason: This design maximizes contact between the cable and the shingles to distribute heat over a larger surface. A typical system includes:
• Roofline cables: These run along the lower edge of the roof to keep the snow melt from refreezing at the eaves.
• Gutter and downspout cables: Because these areas freeze first, keeping them warm makes sure water can drain freely. Running a roof cable along gutters and downspouts keeps water from freezing.
• Sensors or thermostats: These automatically switch the system on and off based on temperature or moisture conditions.
While you can hire a professional to install roof cables, if you’re comfortable on a ladder this is a job you can easily DIY. Watch this video before you get started for easy-to-follow, step-by-step instructions:
Why Choose Frost King Roof Cables?
Not all heating cables are created equal. Here’s what makes Frost King’s roof and de-icing kits the gold standard:
• Self-regulating versus constant-wattage: Constant-wattage thermostats are energy hogs. Frost King’s kits use a self-regulating thermostat to kick on only when outdoor temperatures are low enough to make ice dams a threat. That means they’re more efficient, and your energy bills will be lower.
• Length and layout options: The size and pattern of your roofline may require different lengths or configurations. Frost King’s kits offer clear instructions on how to plan your cable arrangement for best results.
• They’re an all-in-one solution: Frost King’s kits come with all the spacers and clips you need for installation, plus you can buy additional clips if needed.
Pairing Roof Cables with Other Winter Prep
Roof cables are a smart way to stop ice dams, but they’re even more effective when combined with other good winter home maintenance practices. Be sure to:
• Clear gutters and downspouts before the first freeze.
• Check for loose shingles, lifted flashing, or gaps around vents that are letting warm air escape.
• Add insulation to the attic floor to reduce heat loss.
• Make sure soffit vents stay open to allow airflow.